Document File Storage Feature
General
IPM Release 6.0.0.1 represents a signifgicant change in the management of external documents. Without the inclusion of any other add-on products, IPM can now store, preview and in some situations distribute documents to external parties. It is possible with this release to add document/file associations to any CRM entity. Individual entity records can be associated with any number of documents/files. For example the entire collection of photos for a project can be stored against the project without any additional records being added. We will detail here the process of using the document component one configured and then the steps involved in modifying a CRM entity to support documents. An important note here is that it is mandatory that a user have some sort of IPM License in order to use this component.
Installation
As with all previous versions of IPM from 5.5.0.1 on the ipm.config file must be updated prior to installation. This file can be copied from the previous installation however it must be altered to include a new variable, IPMDocsFolder. The setting is highlighted below.
- <?xml version="1.0" encoding="UTF-8"?>
- <configuration>
- <appSettings>
- <add key="IPMWebServer_AppPoolUserName" value="NetworkService"/> <!-- Other possible values: ApplicationPoolIdentity or any DOMAIN\USER -->
- <add key="IPMWebServer_AppPoolUserPassword" value=""/> <!-- It's required only if you specified a domain user as AppPoolUserName above -->
- <add key="IPMWebServer_PortHttp" value="9090"/> <!-- Make sure that port is not used by other programs -->
- <add key="IPMWebServer_PortHttps" value="9091"/> <!-- Make sure that port is not used by other programs -->
- <add key="IPMDocsFolder" value="C:\IPM_DOCS"/> <!-- Path to folder to store documents linked to CRM records -->
- <add key="CrmSQLServer" value="WS2012"/>
- <add key="CrmAuthenticationMode" value="AD"/> <!-- AD or Claims -->
- <add key="CrmUrl" value="http://WS2012:5555/"/> <!-- You must specify CrmUrl if CrmAuthenticationMode = Claims, for example: https://org1.ipmglobal.net:444/
- If CrmAuthenticationMode = AD - you don't need to specify CrmUrl (it will be taken from the registry),
- but if you specify CrmUrl, for example, http://w2008r2:5555/ (don't use localhost in CrmUrl),
- then this CrmUrl will be taken into account instead of one from the registry. -->
- <!-- Remove comments below if CrmAuthenticationMode = Claims or if you want to use specific credentials when CrmAuthenticationMode = AD -->
- <!--
- <add key="CrmUsername" value="Administrator"/>
- <add key="CrmPassword" value="pass@word1"/>
- <add key="CrmDomain" value="IPM"/>
- -->
- </appSettings>
- </configuration>
Once installed there are 2 additional entries required in the IPM Settings area. These are shown below.
- <IPMSettings>
- <Setting Name="ipm_http_url" Value="http://ws2012:9090/"/>
- <Setting Name="ipm_https_url" Value="https://ws2012:9092/"/>
- <Setting Name="ConnectionString" Value="Data Source=W2008R2;Initial Catalog=IPM_MSCRM;Integrated Security=SSPI"/>
- <Setting Name="ipm_dataimporttool_lookupdepthlevelmax" Value="1"/>
- <Setting Name="ipm_previewfileswithextensions" Value="pdf,bmp,tif,tiff,gif,png,jpg,jpeg"/>
- <Setting Name="ipm_docsdownloadbuttons" Value="1"/>
- </IPMSettings>
The first of these settings "ipm_previewfileswithextensions": list only file extensions you want to display in Preview IFRAME and your browser must be able to display them OR there must be plugins for your browser installed – such as http://www.bluebeam.com/us/products/free-viewer/ for PDFs)
bmp,tif,tiff,gif,png,jpg,jpeg – should be displayed in Preview IFRAME without any plugins in all browsers
pdf – will be displayed in Chrome/Firefox without Plugins, for IE you can install http://www.bluebeam.com/us/products/free-viewer/
The second setting "ipm_docsdownloadbuttons" details are:-
- missing setting OR "" or "0" or "1" or any other value (except “2” and “3”) => only one button "Download" will be displayed (always returns original file)
- "2" => only one button "Download" will be displayed (always returns file as ZIP)
- "3" => 2 buttons: "Download" (always returns original file) and "Download ZIP" (always returns file as ZIP) will be displayed
User Interface.
The user interface is relatively self explanatory.
- Browse Bar - There is a browse bar with a browse button that allows the selection of one or many files simultaneously.
- Individual files or selections of files can also be dragged onto the drop area from uploading.
- Once selected or dropped the progress of the upload is shown on the progress bar.
- Due to limitations in xml technology it is not currently possible to drag an attachment from an email in outlook to the drop area. Any attachments would need to be saved to a location, possibly your desktop before dragging to the drop area. It is however it is possible to drag an attachment from an email in outlook to the new IPM Uploader application which will then allow the creation of new record or the adding of files to existing records. This application is discussed later in this document.

Once the files have been uploaded then by default, the first file uploaded will be previewed in the display window when the entity record is opened. The other files are shown in a list down the side of the preview window. IPM does not provide any software to show files so the operating system must have components installed to view the files if they are to appear. The following file extensions are usually rendered without installing any additional software, pdf, bmp, tif, tiff, gif, png, jpg,jpeg and only these file types will be rendered by default. If you believe there is software installed that will open other file extensions then this list of enabled file extensions can be amended, this is discussed later in this document.

On the top of the list of files there is a download all button. This button will download all the associated files. Clicking this button will create a zip file called package.zip to be created and downloaded. Double clicking an individual file name will allow download that file in its original form.
IPM Drawings and Documents
IPM Drawings and Documents is a standard IPM Entity. It is used to manage all traditional project drawings and documents. There are a number of aspects of this particular entity that are of importance.
The Drawings and Documents entity has a standard approach to managing versions. When accessing the list of Drawings and Documents, there is a New Revision/Sketch button that creates a new revision of a drawing record. This process makes a complete replica if the original document and opens it for amendment. During the process, it will increment the Revision Number of the previous revision was numeric however if the previous revision was an alpha character or involved alpha characters then it will present "????" as the revision number to make the user aware that they need to manually update this field.


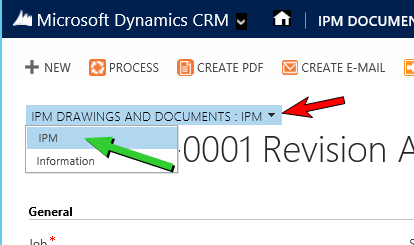
In version 6.0.0.1 Drawings and Documents has 2 alternative forms included in the solution. The first is the standard "Information" form and the second is the a new "IPM" form that has been amended to include our new document component. The new form can be selected by clicking the down arrow indicated in the screenshot below by the red arrow indicator and then selecting IPM.
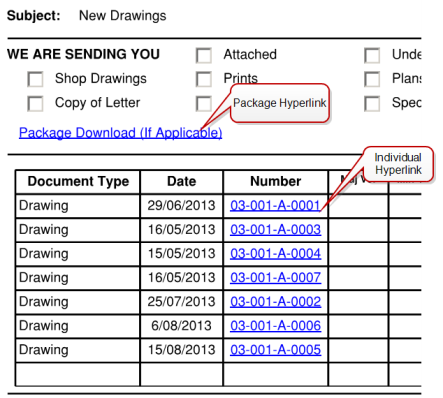
Files stored against drawings and documents can be distributed as hyper-link downloads. For example, a transmittal created to distribute drawings can contain hyper-links to download these drawings. It will typically include 2 types of hyper-links, a package hyper-link and an individual hyper-link. The package hyper link will download all associated documents whereas the individual hyper-links will download just those files. For these hyper-links to work for external parties, the CRM application must be IFD deployed.
Only Drawings and Documents can be downloaded using this approach and must be added to other documents like Transmittals using IPM standard functionality. Documents that support this functionality include :-
- Purchase Orders
- Progress Bills
- RFI's
- RFQ's
- Subcontracts
- Subcontract Variations/Change Orders
- Submittal Items
- Transmittals
- User Document 1
- User Document 2
Adding File Support to an Entity.
Any entity can be enabled to store documents and files however there a few steps required to make this possible.
Modifying the Entity Form
- Add a new section to the form and place in an appropriate position on the form.
- Deselect the "Visible" property for the section.
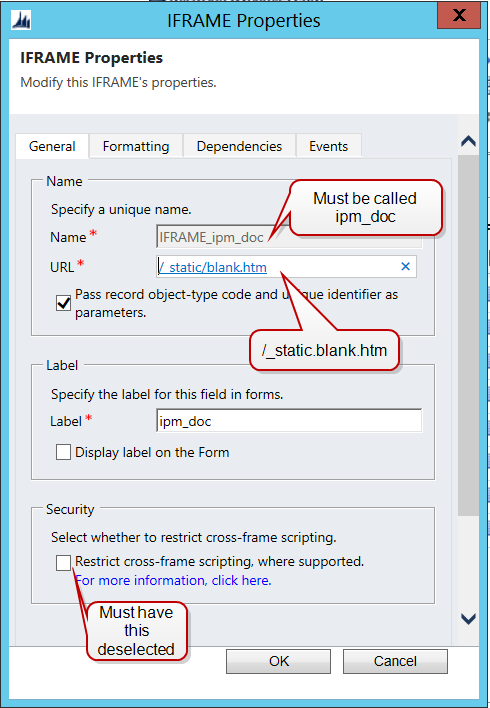
- Add an iframe to the section and call it ipm_doc
- Deselect the "Restrict cross-frame scripting"
-
Form Properties
Changes must be made to any non standard IPM Document. This change merely brings the IPM Script files into scope so that the components can run.
- Go to the Form Properties on the form designer toolbar.
- In the Form Libraries area add ipm_common_library.js
- In the event handlers area add the Function "IPM.initIPMContext"
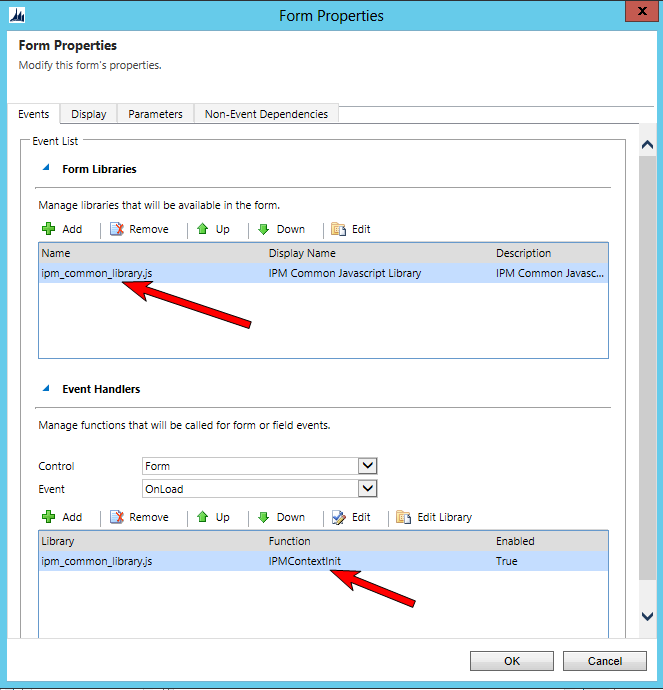
The form should now be enabled.
Mixed Content Message
Following the instructions above you will be able to enable any crm record to store documents. The challenge is if you have an IFD deployed site, on opening the document you may get an annoying message that only secure content is being displayed and asking if you want to show all content. This is because CRM automatically appends http:// to the URL you add to any iframes. To avoid this there is a simple process that must be followed as below.
- By default the IFRAME URL becomes http:///_static/blank.htm if you type /_static/blank.htm
- To fix IFRAME URL you need to add your entity to a temp solution, publish all customizations, export it, unzip it, edit customizations.xml in Notepad, search for <Url> and make sure that you have the following line:
- <Url>/_static/blank.htm</Url>
- There shouldn’t be any http or https in that URL
- Then ZIP all files back into new.zip and upload new.zip solution into CRM, publish all customizations
Adding a "Child Entity Preview
You can add a preview to a parent document where there is a direct relationship to a child document. A relationship such as this would be where a Invoice Scan document is used to generate an invoice document. In this case the Invoice needs to have a lookup to the invoice scan document.
Add an IFRAME called ipm_childdoc to a section on your parent entity form and make sure that the Visible property of the section is not ticked.
The ipm_common_library.js is not required to be added the list of javascript libraries for your entity form FOR THIS TASK, but you can add it if you like
You need to have entity Javascript library: create it or use existing one
You need add code to Form_onload function if you already have Javascript library OR when you create new Javascript library – add the following code:
- function Form_onloadChild(ExecutionObj)
- {
- }
- Between { and } of the function – add the code (change only component names highlighted in yellow):
- if (Xrm.Page.ui.getFormType() == 2) //CRM_FORM_TYPE_UPDATE
- {
- var control = Xrm.Page.ui.controls.get("IFRAME_ipm_childdoc");
- if (control != null)
- {
- var id = "";
- var entityName = "";
- var lookupData = Xrm.Page.data.entity.attributes.get("lookupattributetoyourchildentity").getValue();
- if (lookupData != null)
- {
- id = lookupData[0].id;
- entityName = lookupData[0].typename;
- }
- if ((id != "") && (entityName != ""))
- {
- var url = prependOrgName("/WebResources/ipm_main.html?data="+encodeURIComponent("/ISV/IPMGlobal/IPM/Tools/Default.aspx?cmd=GetIPMDoc&mode=1&entity="+entityName+"&id="+id.toUpperCase()));
- control.setSrc(url);
- control.getParent().setVisible(true);
- }
- }
- }
After adding this library to the form properties, you must initiate the function call in the event handlers section,
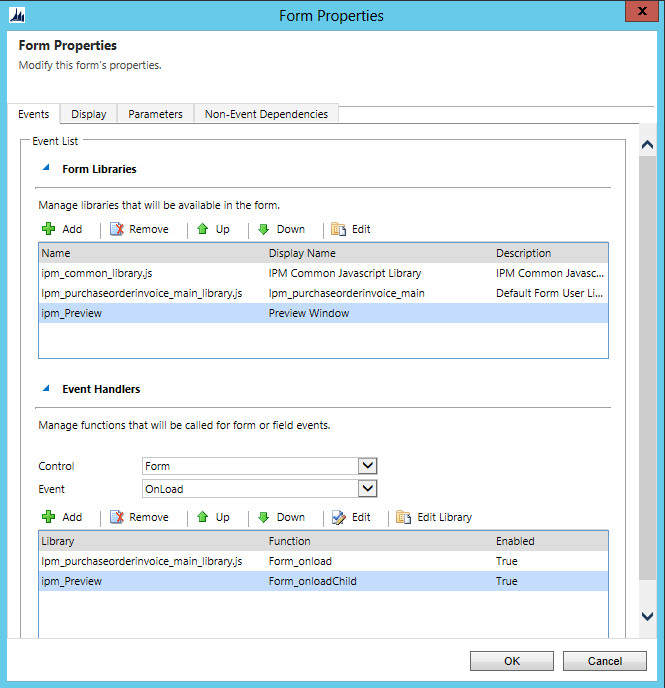
Enabling Download Links on Forms
There are 3 requirements for the Download Links for the IPM Forms. The first is the Docstore Url needs to be updated to:-
https://ipmweb.domain:port/ISV/IPMGlobal/IPM/Tools/Default.aspx?orgname=ORG&cmd=GetIPMDoc
Note: If you have been using the Archive components previously sold as DocStore you should not make this change until after you have converted your documents.
In addition, your documents need to be updated to include new URL's.
URL for downloading a single document:
DocstoreURL+ "&mode=0&entity=ipm_drawing&id=" {00000000-0000-0000-0000-000000000000}
URL for package download:
DocstoreURL+"&mode=4&entity=ipm_transmittal&id="{00000000-0000-0000-0000-000000000000}
In the second URL where ipm_transmittal is recorded, this should be replaced with the appropriate IPM entity, for example "ipm_rfi"
These URLs should be built dynamically in the report design query and used as an action on appropriate fields in the report design.
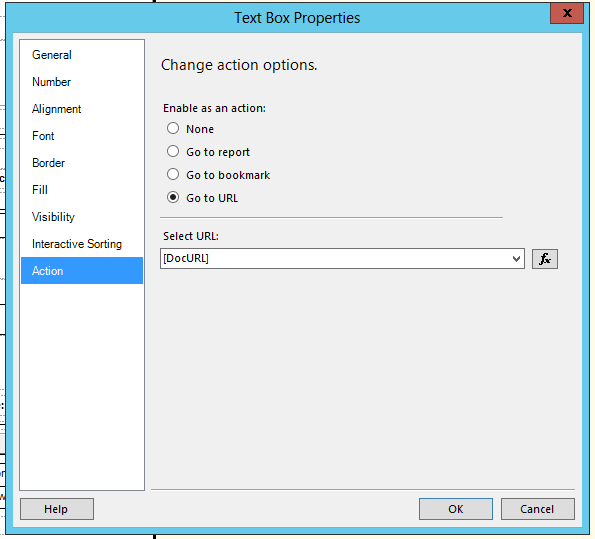
Converting from an existing DocStore installation
If your client is using the Archive DocStore application and you would like to convert them to the new components then there is a prebuilt conversion page. After installing the new version but prior to updating the DocStore URL on the settings page.
To access the conversion page, log into CRM normally and then within the same browser, on a separate tab past in an amended version of the following URL:-
- https://ipmweb.domain:port/ORG/WebResources/ipm_main.html?data=%2fISV%2fIPMGlobal%2fIPM%2fTools%2fCopyDocuments.aspx
Additional Information
- Only licensed IPM users having CRM “System Administrator” security role assigned can view the page
- Only entities having “[entity]_documentid” attributes (entities that were set up for storing documents in the old IPM Documents Library) are displayed in the “Entities” dropdown list
- You can Suspend OR Resume process after you clicked Start
- If CRM record has any linked document it will be copied to the new IPM Documents Library – filename will be displayed in the log
- If it doesn’t – message “No linked documents found” will be displayed
- You can repeat the process as many times as you like – no files will be deleted from the old and IPM Documents Library or the new one
- Large files stored in old IPM Document Library may take long time to process (approx. 1-3 minutes per each 100Mb) – please be patient
Other Information
The IPM Drawing entity also has new “Two Options” (Boolean) attribute “ipm_dontallowtoreuploadfile”. It’s not added and it’s not required to be added on the form. It is set to True when file has been uploaded – you won’t be able to re-upload file straight away
There is an On-demand process “IPM Drawing Allow To Re-Upload File” for Drawing entity included in “IPM_MSCRM2” unmanaged solution – you can run it (or use it in “Process” button Dialogue) to set Drawing “ipm_dontallowtoreuploadfile” field to False – to be able to re-upload file for the Drawing
If you want to prohibit re-uploading of a file after first file was uploaded – you can add new “Two Options” (Boolean) attribute “ipm_dontallowtoreuploadfile” to your entity, don’t add it to the form. If you don’t add “ipm_dontallowtoreuploadfile” field to the entity – you will always be able to re-upload a file for the entity
You need to set up a dialogue or process for your entity to set “ipm_dontallowtoreuploadfile” to False and then reload the form to be able to re-upload a file
If the entity has the following fields then they will be populated when the first document is added:
- ipm_drawing_filename
- ipm_drawing_filesize
- ipm_drawing_fileextension
Where ipm_drawing cna be replaced by the entity name.
Desktop Document Uploader.
The Desktop Document Uploader allows uploading multiple files simultaneously. See more info
